Secure Connections
Preface
As the Pactus blockchain grows, the need for individuals and merchants to communicate and interact with Pactus nodes is increasing. Pactus provides several communication protocols, including gRPC, JSON-RPC, and HTTP APIs. These protocols are built into the Pactus software, and users can choose to enable or disable them as needed.
In this tutorial, we will explain how to secure communication with Pactus nodes.
Overview of Secure Communication Setup
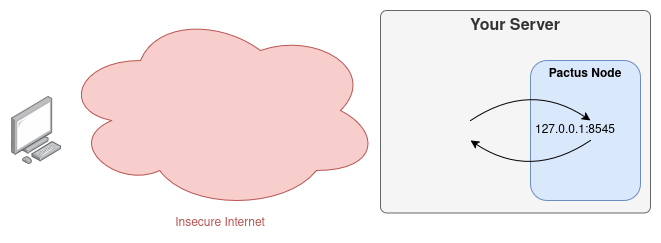
You can configure the Pactus node to enable any of the communication protocols you need. By default, only the gRPC protocol is enabled and accessible locally. Here’s the default Pactus Configuration:
[grpc]
enable = true
enable_wallet = false
listen = '127.0.0.1:50051'
basic_auth = ''
[jsonrpc]
enable = false
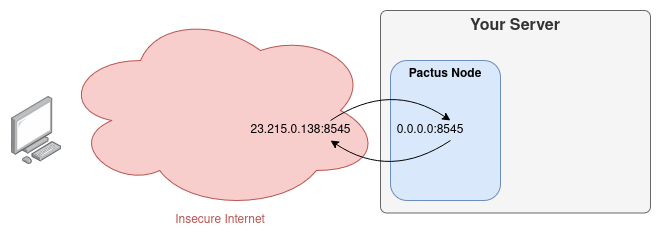
listen = '127.0.0.1:8545'
origins = []
[http]
enable = false
listen = '127.0.0.1:8080'
base_path = '/http'
origins = []The enable field determines whether the communication protocol is active.
The listen field defines the address where the protocol is accessible, in the format <ADDRESS>:<PORT>.
The port specifies which TCP port the protocol should use.
Choose a free port that isn’t already in use by another application.
The address is typically an IP address.
Special addresses like 127.0.0.1 or localhost are only accessible locally and are not publicly accessible.
The origins field controls CORS (Cross-Origin Resource Sharing),
specifying which web domains can access the API (e.g., “wallet.pactus.org”).
Use * to allow all domains (not recommended for production).
You can change the address to make it publicly accessible—which is not recommended—for example: 0.0.0.0:50051.
The address 0.0.0.0 tells the operating system to expose the port to all available network interfaces,
making the protocol accessible over the public IP of your server.
This allows anyone on the internet to potentially connect to your node.
To enable a secure communication protocol—or to upgrade HTTP to HTTPS—you need to register a domain name. You cannot enable HTTPS for a plain IP address, because the TLS, the protocol that powers HTTPS, relies on domain names to validate security certificates issued by trusted Certificate Authorities (CAs). These certificates are tied to specific domain names, not to IP addresses. Therefore, a stable domain name is required to properly configure and maintain a secure connection.
There are many domain name providers where you can purchase a domain.
Once you’ve registered a domain,
you need to connect it to your server by configuring an A Record in your domain’s DNS settings.
An A Record maps your domain name to the IPv4 address of your server,
allowing visitors to reach your server using the domain.
Verify the A Record using the
dig command:
dig pactus.org +short
# Replace pactus.org with your domain
If the configuration is correct, this will return the IP address associated with your domain.
Once your domain is correctly assigned to your server’s IP, we can begin securing the communication protocol. To secure communication, we will use Nginx. Nginx is a free, open-source, and secure web server that can act as a reverse proxy. A reverse proxy means that Nginx stands between external clients (users) and your internal services (like the Pactus node). It accepts incoming requests on behalf of your server, handles the secure TLS/HTTPS connection, and forwards the request to your Pactus node over the internal network.

This setup ensures that sensitive APIs are never directly exposed to the internet. Only Nginx is exposed, and it acts as a security gateway. Users communicate securely with Nginx, which handles encryption and certificate validation. If the connection is valid, Nginx forwards the request to the Pactus node, then sends the response back to the user over the secure channel.
Setup Secure Communication
This tutorial assumes you’re running Pactus on a Linux machine, and it covers Debian or Ubuntu distributions. However, the steps are similar for other Linux distributions.
Install Nginx
Installing Nginx is straightforward:
sudo apt update
sudo apt install nginx
After installation, you can start and enable Nginx service with:
sudo systemctl enable nginx
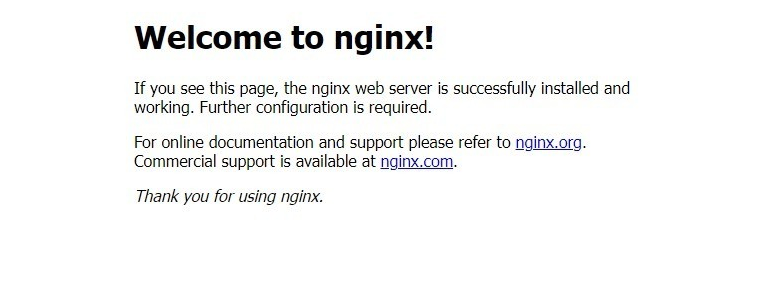
sudo systemctl start nginxAt this point if you visit your website with http://your-domain.com,
you should be able to see the Nginx Welcoming message:
Obtaining SSL Certificates
Now that we have set up the reverse proxy, it’s time to obtain an SSL certificate to enable HTTPS. We will use Certbot, a free and widely used tool for automating the process of obtaining and renewing SSL certificates from Let’s Encrypt.
The Certbot Instructions is well-documented on its official website. Choose Nginx as HTTP software and Linux (snap) as your system and continue the instructions.
If the domain is properly configured and pointing to your server, Certbot will:
- Verify your domain ownership.
- Obtain the SSL certificate from Let’s Encrypt.
- Automatically configure Nginx to use HTTPS with the new certificate.
Now, you should be able to access your node securely via https://your-domain.com.
Try opening it in your browser to confirm that the secure connection is working.
Configure Nginx
The Nginx configuration can be found at /etc/nginx/sites-available/default.
Before changing the config file, first let’s make a backup of that.
sudo mv /etc/nginx/sites-available/default /etc/nginx/sites-available/default_bakNow, using the Nano text editor, let’s create a new configuration file:
sudo nano /etc/nginx/sites-available/defaultPaste the following content into the file:
| |
Make sure to replace your-domain.com with your actual domain name in lines 6, 8, 21, 23, and 24.
This configuration sets up Nginx as a reverse proxy for three endpoints:
/grpc-webforwards requests to the gRPC server running on port50051on localhost./jsonrpcforwards requests to the JSON-RPC server running on port8545on localhost./httpforwards requests to the HTTP API server running on port8080on localhost.
Verify and Restart Nginx
Before applying changes, always test your Nginx configuration:
sudo nginx -tThis command checks for syntax errors in your configuration files. If you see “syntax is ok” and “test is successful”, you can safely restart Nginx:
sudo systemctl restart nginxTesting Your Connection
We’ve built a simple testing tool at https://ping.pactus.org that you can use to verify your node’s connectivity and HTTPS configuration.